Home 8085 Overview Functionality Main Screen Menus Installation Download
// Features//
Code Pad
 Code Pad is the Notepad like component of
the Software where codes are written in Assembly Language. Beside this Code Pad
have some activities to help user to write the code correctly. After every
Opcode is written it drops down a list to select the next item to complete the
code when needed. When user types Hexadecimal Data or Address Locations it
restrict the letters within the hexadecimal range of 0 – F and also restrict
the maximum no. of letters to be written to complete the code. An information
bar above the line of code being written will display the proper syntax
information for the opcode. Above all if a line of code with wrong syntax found
in the codepad, compiler gives an error message informing user about the
correct syntax whenever user changes the line. This feature is known as Auto Syntax Ckeck. This is proved to be
helpful when long codes are to write.
Code Pad is the Notepad like component of
the Software where codes are written in Assembly Language. Beside this Code Pad
have some activities to help user to write the code correctly. After every
Opcode is written it drops down a list to select the next item to complete the
code when needed. When user types Hexadecimal Data or Address Locations it
restrict the letters within the hexadecimal range of 0 – F and also restrict
the maximum no. of letters to be written to complete the code. An information
bar above the line of code being written will display the proper syntax
information for the opcode. Above all if a line of code with wrong syntax found
in the codepad, compiler gives an error message informing user about the
correct syntax whenever user changes the line. This feature is known as Auto Syntax Ckeck. This is proved to be
helpful when long codes are to write.
User Data Grid
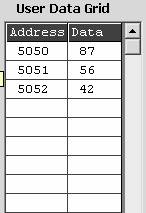
The User Data Grid is used if someone
wants to store data at some specific locations of the memory to use as a data
and not an instruction. The data written here can also be used as instructions
by converting them into Assembly Language using Mnemonic Builder. Thus where
codepad is used to enter instructions in Assembly Language, User Data Grid is
used to enter data in hexadecimal code as it is in original Hardware Kit of
8085.
When one wants to enter data
serially to the memory User Data Grid requires only the starting address of the
memory and thereafter it automatically generates the next address location
incrementing the previous location by one. There is no limitation in entering
data through the user data grid.
Hex Code Grid
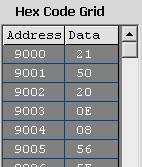 Hex
Data Grid is used by the compiler and user it cannot use it. When Compiler
compiles the codes in Assembly Language and converts it to hexadecimal code it
generates the hexadecimal code in the Hex Data Grid. The starting address of
the Hex Data Grid is taken from the Starting Address field of the Code Editor.
It has no limitation in generating hexadecimal codes even not the limitation of
having only Memory locations from 0000 to FFFF. Reaching at the end of the
memory location it automatically starts writing from 0000.
Hex
Data Grid is used by the compiler and user it cannot use it. When Compiler
compiles the codes in Assembly Language and converts it to hexadecimal code it
generates the hexadecimal code in the Hex Data Grid. The starting address of
the Hex Data Grid is taken from the Starting Address field of the Code Editor.
It has no limitation in generating hexadecimal codes even not the limitation of
having only Memory locations from 0000 to FFFF. Reaching at the end of the
memory location it automatically starts writing from 0000.
Code Key Pad
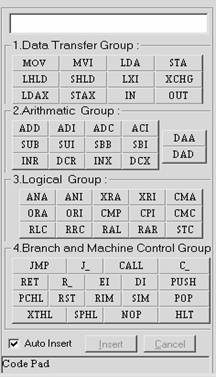
Code Key Pad is the most interesting feature of the Microprocessor Simulator Software Kit, where user can enter codes in the Code Pad with a few clicks of mouse. Basically it is a click-n-generate interface of writing codes. It directs the user in the direction to write codes so that users who are learning 8085 Assembly Language can generates error-free codes knowing little about the syntax. This way of writing codes is also faster than writing codes in Code Pad. The status bar below the Code Key Pad interprets the opcodes to their corresponding functions so that user can generate as well as can learn and remember the opcodes.
Output:
![]()
Output of the execution is visually shown in a bar above the Codepad, where user can observe output all at a glance. It consists of Memory Cycles, T-States, Time of Execution, all the General Purpose Registers [A, B, C, D, E, H, L], the Memory [M], Stack Pointer, Program Counter, all Flag Registers [S, Z, AC, P, CY] at one visual interface. Time of Execution shows the actual time needed for a processor of the clock frequency set previously by the user.
![]()
Basics Operations
Basic Operations of using Microprocessor 8085 Simulator Software Kit consists of the following:
i] Creating New Code file
ii] Opening an existing Code file
iii] Writing Codes
iv] Saving Codes
v] Converting Codes
vi] Setting Clock Frequency
vii] Debugging & Executing Codes
1 Creating New
Code File
Steps to create a New Microprocessor Code file with extension ‘mpc’:
1. Click on the File Menu and then Click New from the menu dropped down.
Or,
Press Ctrl+N from the keyboard
Or,
Click on the New ![]() button on the toolbar.
button on the toolbar.
2
Opening An Existing File
Steps to open an existing file :
1. Click on the File Menu and then Click Open from the menu dropped down.
Or,
Press Ctrl+N from the keyboard
Or,
Click on the Open ![]() button on the toolbar.
button on the toolbar.
2. Browse the directories to find out the file of extension ‘mpc’.
3. Select the file and click Open to open the file.
You can also click Cancel to return to the code editor without opening a file.
3
Writing Codes
Codes can be written in either in Assembly Language or as Hexadecimal instructions.
1 Coding in
Assembly Language
To write the codes in Assembly Language one can straight type the codes in Codepad or can use the Code Key Pad whatever he find helpful to him. Yet in any way user will get information on the various abbreviated opcodes the functions of which are hard to remember. After every Opcode is written it drops down a list to select the next item to complete the code when needed. When user types Hexadecimal Data or Address Locations it restrict the letters within the hexadecimal range of 0 – F and also restrict the maximum no. of letters to be written to complete the code. An information bar above the line of code being written will display the proper syntax information for the opcode. Above all if a line of code with wrong syntax found in the codepad, compiler gives an error message informing user about the correct syntax whenever user changes the line. This feature is known as Auto Syntax Ckeck. This is proved to be helpful when long codes are to write. If you type in a valid opcode you will get information in the Info Bar about the syntax of that Opcode.
Also codes can be written using Code Key Pad which is the most interesting feature of the Microprocessor Simulator Software Kit, where user can enter codes in the Code Pad with a few clicks of mouse. Basically it is a click-n-generate interface of writing codes. It directs the user in the direction to write codes so that users who are learning 8085 Assembly Language can generates error-free codes knowing little about the syntax. This way of writing codes is also faster than writing codes in Code Pad. The status bar below the Code Key Pad interprets the opcodes to their corresponding functions so that user can generate as well as can learn and remember the opcodes.
2 Coding in
Hexadecimal Instructions
The User Data Grid is used to store
data at some specific locations of the memory to use as a data. The data
written here can also be used as instructions by converting them into Assembly
Language using Mnemonic Builder. Thus where codepad is used to enter
instructions in Assembly Language, User Data Grid can be used to enter data in
hexadecimal code as it is in original Hardware Kit of 8085. But compiler always
executes codes from the Codepad and not from the User Data Grid. The
instructions written in User Data Grid should be at first converted to Assembly
Language to use it as instruction.
When user wants to enter data
serially to the memory User Data Grid requires only the starting address of the
memory and thereafter it automatically generates the next address location
incrementing the previous location by one. There is no limitation in entering
data through the user data grid. After at the end of the memory location Data
Grid resets automatically to enter data from 0000h.
Saving Codes
The software supports saving of codes in files with extensions mpc. Saved file contains the contents of the Codepad, User Data Grid, Hex Code Grid and the Starting Location of the Hex Code Grid. These files can be opened in the software for further editing.
Converting Codes
Microprocessor 8085 Simulator Software Kit supports two-way conversion of the codes:
i] Assembly Language to Hexadecimal Codes (Hex Builder)
ii] Hexadecimal Codes to Assembly Language (Mnemonic Builder)
Hex Builder
Hex Builder converts the codes written in Assembly Language to Hexadecimal Codes as it is done every time when the software executes the instructions. Though user can just builds the Hexadecimal Codes without executing the codes when it is not needed to execute.
Steps to Build Hexadecimal Codes:
Click on the Converter Menu and then Click HexBuilder from the menu dropped down.
Or,
Press Shift + F5 from the keyboard
Mnemonic Builder
Mnemonic Builder converts the codes written in Hexadecimal Codes to Assembly Language codes.
Steps to Build Hexadecimal Codes:
Click on the Converter Menu and then Click Mnemonic Builder from the menu dropped down.
Setting Clock Frequency
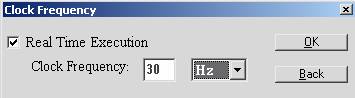
Setting Clock Frequency of the Microprocessor helps user to observe the execution in Real Time if the Real Time Execution Checkbox is checked. if it is unchecked compiler will execute as faster it can do according to the clock frequency of the machine in which it is running, though Time of Execution will show the time according to the frequency set by the user. This can help user to execute without a Delay function in his code.
Debugging & Executing Codes
To debug the code user can choose to execute step-by-step using the Step into operation (menu: Simulate à Step into). In each and every step Output Bar shows the Output Status from the various Registers and Flags. User can also choose to execute all codes at a time by using Start (menu: Simulate à Start). The execution in progress can be stopped at any time by pressing Stop button in the toolbar or pressing F9. This is proved to be helpful specially when a execution falls in endless loops.